Viewing entries tagged
Photography Tips

Comment

Using Off Camera Flash with Ray Flash and Pocket Wizards

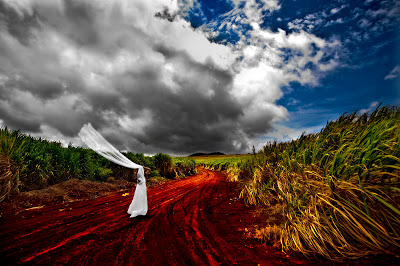
This image was taken yesterday at my workshop in Tampa Florida where we went down at shot at the historic Fort Desoto.  It was an amazing sunset and the best way for me to take advantage of it was by using off camera flash.  So, I hooked up two Pocket Wizards, one to the top of my camera and the other to my SB910 Speedlight, and then had an assistant hold the light towards the model in the direction she was looking...but wait!  A key ingredient to all of this is the Ray Flash.  I can't endorse this product enough!  I slipped the Ray Flash onto my SB910 which I always do for off camera lighting and the results are just amazing.  I got beautiful even lighting which means you can virtually shoot like you're in a studio anywhere.  It's just awesome guys.  If you've been to one of my workshops where I do off camera flash you know what I'm talking about.

Camera settings: Nikon D700, 1/125 sec at f/5.0, ISO 100, flash fired.  Taken at 5:40pm on November 13, 2012 by Jason Lanier.

Comment

8 Comments

Creating Motion Blur in Wedding Images


Creating motion blur in wedding images- this shot was taken at my wedding for David and Elaine last month down in La Jolla, California. The key to creating a shot like this is to use a neutral density filter and a tripod which enables you to slow down your shutter and shoot on a tripod during the middle of a very sunny day like this one. You have to get the bride and groom to hold still which they did a great job of on this shot. The goal in this image was to get the water to appear as if it's continually moving, which makes it fun because the rocks and wedding couple are completely still. This is a trick that landscape photographers use, and since I am a landscape photographer I know how to do it! Camera settings: Nikon D3, 1/4 sec at f/22, 16mm at ISO 100, flash did not fire. Taken at 1:01pm on November 26, 2011 by Jason Lanier.

8 Comments

10 Comments

Top 8 Tips to Improving Lightning Photography-Part 2

Yesterday I wrote a blog about the Top 8 Tips to Improving Lightning Photography that included the first 4 tips. Below is the complete list of 8 tips that I hope will help all Lightning chasers everywhere! All the shots below were from a shoot I did while on a Carnival Cruise ship in the Caribbean from 1:30am to 5am. More shots from this shoot can be found on the previous blog posting.
  1. Find a way to stabilize your camera (tripod is the best option....but it's also a lightning rod)! You can either be a little crazy like me and assume that when it's your time to die it's going to happen no matter what, or you can set it on a tripod, turn on your self-timer or intervalometer and reduce your chances of getting hit by lightning by walking away from your camera.
  2. Set your exposure for when the lightning hits, otherwise when it does hit your shots will be severely overexposed if you are exposing for the night sky without taking into account the immense amount of light the lightning shines into the sky. You will have to experiment for probably 10 minutes in shooting to get this right. How do you do it? You mount your camera, open the shutter up for at least 4 seconds and wait for lightning to hit in the frame of your shot during the shutter being open for 4 seconds. Start adjusting your settings to get the right exposure.
  3. SLIGHTLY underexpose the image. It's much easier to raise the exposure in Lightroom, Aperture, etc. than it is to try and fix an overexposed shot. PLUS, when you do get that shot where there is a lot of lightning you run the risk of overexposing that shot if you aren't slightly underexposing. 1 or 2 stops under should do the trick.
  4. Manual Focus- don't even try auto focus for these shots. You will miss it every time because the camera will have try to focus each and every time you press the trigger. And the worst part is it won't be able to focus because you are pointing at a big dark sky. What you need to do is auto focus your lens on something else around you (like the light from a lightpole), then change your focus to manual on your camera. No light poles around you? Use your car lights, flashlight, anything to shine light on an object that's not too close to you to be able to get your focus correct.
  5. Aperture- don't go with a wide aperture, it will be even more difficult to focus and there is a large chance that elements in your image will be out of focus as a result. If you leave your shutter open long enough you won't need a wide aperture.
  6. Wide lens- use a wide lens if possible. For the shots I took this evening I used a Nikkor 24mm lens. For a few shots I used a Nikkor 50mm but didn't use it for very long. Why? Because a wide lens is much better to create a bigger "canvas" for God to paint with lightning. Simply put, you have a much better chance capturing lightning with a wider lens.
  7. Low(er) ISO- I shoot with the D3 which is famous for it's amazing ISO sensitivity. Despite that when I shoot lightning I really don't need a high ISO because I am using the long shutter (usually 5 seconds or more) to allow the amount of light I need in. I lower the aperture because I know with night shots I want as little noise as possible in the shot for post processing purposes. Using a D3, a low aperture for me is anything under 2000. For other cameras I highly recommend keeping it under 1000.
  8. Patience- you might get lucky and get the shot of the century after 15 minutes....chances are you won't. That is due in large part because you are at the mercy of where the lightning strikes, fortunate that your shutter is open when it strikes, and it takes time to get your settings correct to account for a subject matter (lightning bolts) that aren't in the frame when you are making your settings.


10 Comments

4 Comments

Shooting Lightning Photography- Top 8 Tips to improving lightning photography Part 1

So I was on a big Carnival Cruise ship this week in the Caribbean and at about 1am I look out my window and see big flashes of light filling the sky. I immediately thought, "That has to be lightning," so I decided to see what I could capture. I have had some great shoots with lightning over the years but this was truly unique. Why? Because I've never had a lightning storm hit while I was on a ship in the middle of the ocean...and we were heading straight for the storm.

I grabbed my Nikon D3 and my monopod. I left my tripod at home for the trip and had to figure out a way to be able to shoot lightning on a moving ship, in a storm, with lots of wind and rain, and virtually no way to keep the camera still to get the shots I needed. So using my monopod I "Jimmy-rigged" the camera and monopod to the railing of the ship using my camera strap to secure it. I have included some pics to show you what I did. I get a lot of questions regarding how to shoot lightning photography. So to help I have created The Top 8 Tips for Taking Lightning Photography:

  1. Find a way to stabilize your camera (tripod is the best option....but it's also a lightning rod)! You can either be a little crazy like me and assume that when it's your time to die it's going to happen no matter what, or you can set it on a tripod, turn on your self-timer or intervalometer and reduce your chances of getting hit by lightning by walking away from your camera.
  2. Set your exposure for when the lightning hits, otherwise when it does hit your shots will be severely overexposed if you are exposing for the night sky without taking into account the immense amount of light the lightning shines into the sky. You will have to experiment for probably 10 minutes in shooting to get this right. How do you do it? You mount your camera, open the shutter up for at least 4 seconds and wait for lightning to hit in the frame of your shot during the shutter being open for 4 seconds. Start adjusting your settings to get the right exposure.
  3. SLIGHTLY underexpose the image. It's much easier to raise the exposure in Lightroom, Aperture, etc. than it is to try and fix an overexposed shot. PLUS, when you do get that shot where there is a lot of lightning you run the risk of overexposing that shot if you aren't slightly underexposing. 1 or 2 stops under should do the trick.
  4. Manual Focus- don't even try auto focus for these shots. You will miss it every time because the camera will have try to focus each and every time you press the trigger. And the worst part is it won't be able to focus because you are pointing at a big dark sky. What you need to do is auto focus your lens on something else around you (like the light from a lightpole), then change your focus to manual on your camera. No light poles around you? Use your car lights, flashlight, anything to shine light on an object that's not too close to you to be able to get your focus correct.
Full list of the Top 8 Tips for Improving Lightning Photography including tips 5 thru 8 are coming next as well as many more shots from this shoot!!

The best thing for you to do is simply look at this like a fireworks show from the heavens and fully take it in. For this shoot in the Caribbean I shot for 3.5 hours. Many times I truly just marveled, yelled, "WOW!" and instead of getting frustrated (which is easy to do), I just enjoyed something truly remarkable. Hope this helps anyone trying to capture lightning bolts or strikes during a lightning storm. If you haven't done it before give it a try and you will LOVE it.
Nikon D3, 5 seconds at f/13.0, ISO 1250 at 24mm.
Nikon D3, 5 seconds at f/7.1, ISO 2500 at 24mm.

I didn't have a tripod with me so I improvised by tying my monopod to the ships railing...


4 Comments

1 Comment

Taking (not making) great pictures

More and more I'm going to be posting images from my weddings and shoots that contain the before and after shots to give a better understanding on some of my photo techniques and to show that you must "take" great photographs, you can't "make" great photographs.

I always say that you can't make a good photograph great, you can only make a great photograph a little better. We're not talking about full on graphic design where you bring in fake skies, different backgrounds, etc...because that's not photography, that's just graphic design. Many times I'm asked where I get my backgrounds. I NEVER use backgrounds in my imagery, truthfully I take a lot of time to make the NATURAL background look great and shoot it properly. For that reason I'm sharing this image from a wedding I shot in Maui, HI in January 2011.

In order to make this image the way I wanted it I had to make sure to shoot it at the right time of day, use the sun the naturally light the bride, and remove any debris from around the bride. I hate spending extra time in PS cloning out things I naturally should have taken care of BEFORE I took the shot. Do I use photoshop to fix acne for example on a brides face that will be the cover of the album? Of course I do. But that's something that's unavoidable. My biggest point in writing this is that photoshop needs to be saved for the unavoidable things, and that any thing a photographer can do before taking the shot is their responsibility to get right.

Any questions please let me know!

1 Comment

1 Comment


Sydney Opera House Breakdown "Cinderella"- this is an image of a wedding I shot in Sydney Australia in May 2009 that I get a lot questions about so I thought I would do something a little different and show a before and after. At a recent wedding one of my photographers asked me if I had the "guts" to show a picture before it was photoshopped. I love "dares" and I thought for this picture it would be instructional so I'm showing the before and after so you can see the difference.


I always tell my photogs that good images can't be made great, only great images can be made a little better. In this day and age of photoshop SO many photographers make the mistake of saying, "Oh well, I'll fix it in photoshop." When I first started I was very dumb and said the same thing. If you want to become a great photographer than you need to hone your skills and not use PS as a crutch. It's a great tool but you have to get the shooting part right. Become a professional photographer than a professional editor, THEN you are DANGEROUS. Enough with my rant.


I used a tripod to capture this image, my video guy to shine light on the bride and groom, put a video light next to her shoe to illuminate it, cropped the image a little, used some dodge and burn, and blurred the sky some. Settings: Nikon D3, shutter 1/80 at f/1.8, ISO 6400, 20mm. Hope this is helpful!

1 Comment

Comment

Composition and shooting in thirds- making a great shot

We continued our shoot on Sugar Cane Road and it was so picturesque I had to pinch myself to make sure I wasn't dreaming. We had blue skies, plenty of wind, great cloud cover, and sunlight piercing through the clouds to give me all the ingredients to create the images and art that I wanted.

One of the most important things when shooting is creating the composition for your shot. I spend the most deciding where to shoot and what to shoot. I had a bride recently say about me, "Jason finds the shot he wants, and then puts you in it." I think that's key so you don't get distracted with the beauty of the bride and forget the surrounding area.

As you can see with the shots below there are vanishing points, highlights, lowlights, etc. But I wanted to focus on the rule of thirds being applied here. The rule of thirds is simple in that you cut the picture into three parts and make sure each is represented within your image. In the images below the three parts would be the sky, sugar cane, and the road....like three significant parts to your picture in one image. This makes for much better images...much more interesting and more beautiful. Let me know if you have any questions and I hope you enjoy!


Comment

Comment

Highlights, Lowlights, and everything in between

We ended our shoot outside on the road in the sugar cane that surrounded the abandoned building we were shooting at...and it was beautiful. I always look for conflicting things and can still come together to make a picture very dynamic but symmetrical at the same time. The picture below for example has a vanishing point that leads directly to the bride...both from the ground and the sky...so all the attention goes straight to her.

The other thing I like to do is draw some contrast with the bride. Sometimes a big white dress can drown out the person wearing it....that is the main reason I love to show some of the bride's legs in the pictures that you see. It makes the images much more dynamic and instead of just a straight white highlights of a wedding dress...you have the contrast of the brides legs...makes for a much more interesting picture. The key is getting your highlights and lowlights to come together to make everything work. It's like a salad where there are a lot of different ingredients but they can come together to make something that tastes great.

Comment

Comment

Gone With the Wind-using wind in photography

There are a few things I look for when starting a shoot. Light, clouds, and wind. Light is obviously very important, and while there are some times during the day where light can be harsh (during the middle of the afternoon like noon-2pm) it can also provide very dramatic effects. The shoot I did with Camlyn was actually done from 12-3pm. You can tell because if you look at the pictures you can tell the light source is directly above by looking at her shoulders and the shadows that fall under her head. This same light though is what makes the veil glow and provides the contrast and highlights that can make your pictures look fantastic.

Wind is also an amazing tool to utilize. Wind makes it more difficult to shoot...there's no disputing that. But without it you can't get these kind of results. I prefer too much wind compared to too little wind because you can typically find a way to block wind you don't want...but it's very difficult to manufacture wind if you don't have it. The best thing to do on a shoot is to set your subject in the location you want and start firing away. The first shot I love because the veil is so playful...and it matches Camlyn's face. The bottom shot is more dramatic and also fits her facial expression...and I love the effect it puts on her face.

The middle shot is more of a movie scene kind of an image and the wind was just slamming through the door which gave us the effect we were looking for. I really do like photoshop...but the more you create through the camera the better your images will be. You can try to create lighting, wind, and clouds in photoshop and they will look good...but nothing is as great as the real thing....


Comment